AI Setup: The Recommended Path
There are many tools around abap2UI5 for working with an AI assistant. You need three steps to start. Each step is useful on its own, so you can stop after any of them. None of them needs an SAP system.
To only try what an assistant can do, without installing anything, open the AI Studio in the browser. The steps below are for the assistant you work with every day.
The Three Steps
Step 1: Give the Assistant the Knowledge and the Tools
In Claude Code, install the abap2UI5 plugin. It brings the skills that explain how an app is built, and the MCP server, a small program that lets the assistant check a view by itself:
/plugin marketplace add abap2UI5/abap2UI5
/plugin install abap2ui5@abap2ui5
In VS Code, install the extension instead. It registers the same MCP server for every assistant in the window:
code --install-extension abap2ui5.abap2ui5With any other MCP client (Cursor, Claude Desktop), register the MCP server alone:
claude mcp add abap2ui5 -- npx --yes -p @abap2ui5/mcp-server abap2ui5-mcpWhat you should see: ask the assistant "which abap2UI5 tools do you have?". It lists tools such as examples, app_guide and validate_view.
Step 2: Let It Check Its Own Work
Keep your apps in a repository made from the app-template. The template has one command that checks every class, and the assistant is allowed to run it without asking:
npm run checkIt runs two checks: abaplint says whether the ABAP compiles, and the abap2UI5 linter says whether the view names controls and properties that UI5 really has.
What you should see: the command ends without findings. From now on the assistant runs it after every change and repairs what it reports.
Step 3: Let It See the Running App
This step is optional. Install a browser for the MCP server:
npx playwright install chromiumThe assistant can now start the app on your machine and look at a screenshot of it. The first start builds the backend once, which takes about a minute.
What you should see: ask the assistant to run the app. It answers with a picture of the screen.
What You Get and What It Costs
| Step | You get | It costs |
|---|---|---|
| 1 | an assistant that knows the current API, finds a sample before it writes code, and checks a view in seconds | two commands, a few megabytes |
| 2 | every class compiled and every view checked, on your machine and on every push | a repository made from the template, and npm ci once |
| 3 | a screenshot of the running app, and tools to fill fields and press buttons in it | a browser download, and about a minute for the first build |
The Tool Map
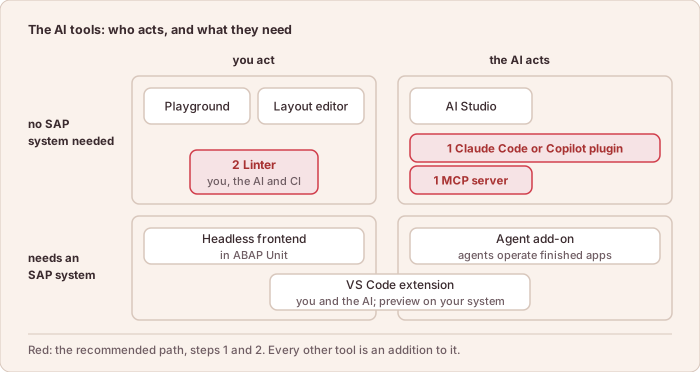
Every other tool is an addition to these steps. Add one when its row describes what you need.
| Tool | Needs an SAP system? | Who acts | When to add it |
|---|---|---|---|
| AI Studio | no | the AI, in your browser | to try an idea without installing anything |
| Playground | no | you | to try a control or share a small example |
| Layout editor | no | you | to sketch a first screen by drag and drop |
| Claude Code plugin, Copilot plugin | no | the AI | step 1 |
| MCP server | no | the AI | step 1; its page lists every tool and the larger setups |
| Linter | no | you, the AI and CI | step 2; also alone in CI for any project |
| VS Code extension | for the preview, yes | you and the AI | to start an app on your system with one key, and to let the AI look at it there |
| Headless frontend | yes | you, in ABAP Unit | to test a whole user session without a browser |
| Agent add-on | yes | AI agents, for your users | when agents should operate finished apps in production |
Which npm package is behind which tool is on npm Packages.
If the Assistant Has No Tools at All
An assistant that can only read web pages, such as a chat in the browser, still works. Paste the paragraph from Developing with AI in front of your task. It tells the assistant which three files to read first.
Next Steps
- MCP Server - every tool, and the setup levels beyond step 3
- Working Off-Stack - the app-template of step 2
- Agent-Operable Apps - the other direction: an agent that uses a finished app